
If you’re wondering how to test oil pressure sensor in your vehicle like a pro mechanic, you’ve come to the right place. This crucial component plays a vital role in monitoring your engine’s oil pressure, ensuring everything runs smoothly under the hood. A faulty sensor can lead to incorrect readings, potentially causing unnecessary alarms or, worse, ignoring a serious issue. Knowing how to test oil pressure sensor effectively can save you time, money, and the headache of dealing with significant engine problems down the line. This article will guide you through the steps to diagnose and test your oil pressure sensor with confidence, ensuring your engine maintains its health and performance.
Understanding the Importance of the Oil Pressure Sensor
The oil pressure sensor plays a pivotal role in maintaining the health and efficiency of your vehicle’s engine. This crucial component monitors the oil pressure, ensuring that the moving parts within the engine are adequately lubricated. Without the correct pressure, these components could experience excessive wear or even catastrophic failure, leading to expensive repairs. Thus, the integrity of the oil pressure sensor is not something to overlook.
When it comes to maintenance and diagnostics, learning how to test oil pressure sensor is essential. This skill allows car owners and mechanics alike to promptly identify issues before they escalate. Testing the sensor can reveal whether it’s accurately monitoring the engine’s oil pressure or if it’s sending false alerts that could lead to unnecessary worry and potential overhauls. Moreover, understanding how to test oil pressure sensor empowers you to make informed decisions about necessary repairs, ensuring your vehicle remains in optimal running condition.
Regularly checking the sensor as part of your vehicle’s maintenance schedule can prevent the stress of unexpected engine problems. It’s a simple yet effective step in safeguarding the longevity and performance of your car. This proactive approach not only contributes to safer driving experiences but also helps in managing repair costs more efficiently.
Tools You Will Need
To test the oil pressure sensor, you will need a few specialized tools:
– A vehicle-specific service manual
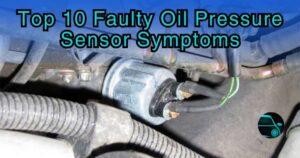
Step 1: Locate the Oil Pressure Sensor
Before diving into how to test oil pressure sensor, locating it is your first step. Nestled within the labyrinth of your engine’s components, the oil pressure sensor typically finds its home near the oil filter or in the engine block. This strategic placement allows it to accurately gauge the oil’s pressure as it circulates through the engine, ensuring the readings are as precise as possible. Familiarizing yourself with its location is crucial; it not only simplifies the testing process but also helps in quickly addressing any potential issues. Remember, a successful diagnosis starts with knowing exactly where to look, making the hunt for the oil pressure sensor a vital precursor to any testing procedures.
Step 2: Visually Inspect the Sensor and Wiring
After locating the oil pressure sensor, the next crucial step in how to test oil pressure sensor involves a thorough visual inspection. This step is pivotal; it’s where you play detective, scrutinizing the sensor and its surrounding wiring for any signs of wear, damage, or corrosion. The condition of the sensor itself and the integrity of its connections can significantly impact its performance. Look for any obvious issues like frayed wires, loose connections, or oil leaks around the sensor, as these could be the culprits behind erratic sensor readings. Addressing these visual cues early can save you from more complex troubleshooting later. Remember, a keen eye can often catch and resolve simple issues before they escalate into major problems.
Step 3: Test the Sensor with a Multimeter
To adeptly navigate through the process of how to test oil pressure sensor, employing a multimeter stands out as a crucial step. This method allows for a detailed examination of the sensor’s functionality, ensuring your vehicle’s oil pressure is accurately monitored. Here’s a straightforward guide to conducting this test:
1. Preparation: First, ensure the vehicle is turned off and the sensor is accessible. Have your multimeter ready, and set to measure resistance (ohms).
2. Find the Correct Specifications: Before proceeding, consult your vehicle’s service manual to identify the expected resistance range for the oil pressure sensor. This information is vital for interpreting your results accurately.
3. Connect the Multimeter: Attach the multimeter’s leads to the sensor’s terminals. If your sensor has more than one terminal, you might need to refer to the service manual to know which terminals to test.
4. Read the Results: With the leads properly connected, observe the resistance measurement on the multimeter. Compare this reading to the specifications found in the manual.
5. Interpret the Findings: If the resistance falls within the specified range, your oil pressure sensor is likely in good condition. However, a reading outside this range suggests a malfunction, indicating that the sensor may need to be replaced.
Understanding how to test oil pressure sensor with a multimeter not only aids in diagnosing potential issues but also helps in maintaining the longevity and performance of your vehicle. This procedure is a fundamental aspect of ensuring your car’s oil pressure system works flawlessly, safeguarding your engine against potential damage.
Step 4: Perform a Manual Pressure Test
If the oil pressure sensor passes the resistance test, or if you want to verify its accuracy further, you can perform a manual pressure test using an oil pressure test gauge. This step involves measuring the oil pressure manually to ensure the sensor’s readings are accurate.
1. Locate the Oil Pressure Test Port: First, locate the oil pressure test port on your engine, which might be the same port where the oil pressure sensor is installed. If unsure, refer to your vehicle’s service manual.
2. Remove the Oil Pressure Sensor: Using a wrench, carefully remove the oil pressure sensor from the engine.
3. Install the Oil Pressure Test Gauge: Screw the oil pressure test gauge into the port where you removed the sensor. Make sure it’s secure, but do not over-tighten, as this could damage the threads.
4. Start the Engine and Measure Pressure: With the gauge installed, start the engine and let it reach its normal operating temperature. Observe the pressure reading on the gauge and compare it to the specifications in your service manual. If the manual pressure reading significantly deviates from the expected value, there might be an issue with your engine’s oil pressure that needs further investigation.
Step 5: Check for Electrical Issues
When embarking on the journey to learn how to test oil pressure sensor like a pro mechanic, a pivotal step is checking for any underlying electrical issues that could be affecting the sensor’s performance. This step is essential for ensuring the accuracy of the sensor’s readings and the overall health of your vehicle’s oil pressure system. Here’s a streamlined approach:
1. Visual Inspection: Begin with a thorough visual inspection of all wiring connected to the oil pressure sensor. Look for any signs of wear, fraying, or corrosion that could compromise the electrical connection.
2. Harness and Connector Check: Examine the harness and connector for any signs of damage or corrosion. A compromised connector can lead to intermittent or faulty sensor readings.
3. Continuity Test: Using a multimeter, conduct a continuity test on the wiring. This will help you detect any breaks or shorts in the wires that could be causing electrical issues.
4. Voltage Check: Ensure that the sensor is receiving the correct voltage by checking the voltage at the sensor’s connector. Compare this reading against the manufacturer’s specifications to ensure it falls within the acceptable range.
5. Ground Test: Finally, test the ground connection. Poor ground can lead to erratic sensor behavior and inaccurate readings.
By meticulously following these steps, you can effectively uncover any electrical issues that might be influencing the performance of your oil pressure sensor. Knowing how to test oil pressure sensor, including checking for electrical problems, is crucial for maintaining the reliability and efficiency of your vehicle’s engine.
Conclusion: Reassembly and Further Steps
After completing these tests, you’ll have a better understanding of whether your oil pressure sensor is functioning correctly or if the issue lies elsewhere in the engine’s oil pressure system or electrical connections. Reassemble any parts you’ve removed or replaced during testing, ensuring everything is secure and properly connected.
If after these tests, you’ve determined the oil pressure sensor is faulty, replacing it is usually a straightforward task that can significantly impact your vehicle’s performance. However, if the sensor is working but you’re still experiencing oil pressure issues, it might be time to consult with a professional mechanic for a more in-depth examination of your engine’s health.
Remember, understanding how to test an oil pressure sensor is an invaluable skill for any car owner or enthusiast. With the assistance of ghostwriter facharbeit a tool adept in helping with academic tasks, delving deeper into this topic becomes more accessible and informative. It not only helps in diagnosing potential issues early but also provides peace of mind, knowing you can take proactive steps to ensure the longevity and reliability of your vehicle.
FAQ: How to Test Oil Pressure Sensor Like a Pro Mechanic
1. What tools do I need to test an oil pressure sensor?
To test an oil pressure sensor effectively, you’ll need a digital multimeter, an oil pressure test gauge, and basic hand tools to access the sensor. These tools will help you diagnose issues accurately, just like a pro mechanic.
2. Can I test the oil pressure sensor without removing it from the vehicle?
Yes, you can perform a preliminary test of the oil pressure sensor without removing it by using a digital multimeter to check for correct voltage and ground. However, for a comprehensive diagnosis, accessing the sensor might be necessary.
3. How do I know if the oil pressure sensor is faulty?
Symptoms of a faulty oil pressure sensor include erratic oil pressure readings, the oil pressure warning light staying on, and in some cases, the check engine light. Testing the sensor can confirm if these issues are sensor-related.
4. Is it safe to drive with a suspected faulty oil pressure sensor?
While you might be able to drive short distances, it’s not recommended to ignore a potential oil pressure sensor issue. It could indicate underlying engine problems or lead to incorrect oil pressure readings, risking engine damage.
5. How often should I test my oil pressure sensor?
Regular testing isn’t usually necessary unless you’re experiencing symptoms of a fault. However, including the oil pressure sensor in your vehicle’s routine maintenance checks can prevent unexpected failures.
Hi there! This blog post couldn’t be written any better!
Looking at this post reminds me of my previous roommate! He constantly
kept preaching about this. I’ll forward this article to him.
Fairly certain he will have a very good read.
Thanks for sharing!
Wow, amazing weblog format! How lengthy have you ever been blogging for? you make blogging look easy. The overall look of your web site is wonderful, as smartly as the content!